What happens after the storm passes and you’re standing in your yard looking at shingles on the ground?
You know you need to file a claim. You’re pretty sure your insurance covers this. But the actual process—who to call first, what to document, how to talk to the adjuster, what happens if they lowball you—feels like a maze nobody explained before you needed to walk through it.
That’s where most homeowners in Jackson County find themselves after a bad storm. Not because they did anything wrong. Because nobody hands you a playbook for filing a roof insurance claim until the damage is already done.
We’ve walked hundreds of homeowners through this process over 30+ years. We’ve seen claims approved in two weeks and claims that dragged on for months. The difference usually isn’t the damage—it’s how the claim was handled from day one. This is the step-by-step guide we wish every homeowner had before the storm hit.
What Homeowners Insurance Typically Covers
Most standard homeowners policies cover roof damage caused by sudden, accidental events. That includes wind, hail, falling trees, lightning, and fire. If a storm rolls through Jackson County and tears shingles off your roof, that’s typically a covered peril.
The key word is “sudden.” Insurance is designed to protect against unexpected events, not gradual deterioration. A tree branch that crashes through your roof during a thunderstorm is covered. A roof that’s been slowly failing for ten years is not.
Covered claims usually include the cost to repair or replace the damaged portion of the roof, plus any interior damage caused by the breach—water-stained ceilings, ruined insulation, damaged drywall. If you had to pay for emergency tarping to prevent further damage, that’s typically covered too.
The specifics depend on your policy. Some policies cover full replacement cost, meaning they’ll pay to replace your damaged roof with new materials of similar quality. Others pay actual cash value, which factors in depreciation. We’ll get into that difference later—it matters more than most people realize.
What Insurance Typically Excludes
Insurance doesn’t cover everything, and knowing the exclusions upfront saves frustration later.
Wear and tear is the big one. If your roof is 25 years old and shingles are failing because they’ve reached the end of their lifespan, that’s maintenance—not a covered loss. Insurers aren’t obligated to replace a roof that was already deteriorating before the storm.
Neglect falls in the same category. If you ignored a small leak for years and now the decking is rotted, the insurer may deny the claim or reduce the payout. They expect homeowners to maintain their property. A roof that fails because of deferred maintenance isn’t a sudden event.
Cosmetic damage is often excluded or limited. Hail might dent your metal gutters or leave marks on shingles that don’t affect function. Some policies won’t cover repairs if the damage is purely aesthetic. Read the fine print—”cosmetic damage exclusion” is increasingly common in Michigan policies.
Flooding is almost never covered under standard homeowners insurance. If water entered your home because of rising floodwaters rather than a roof breach, you’d need separate flood insurance. Storm surge, overflowing rivers, and standing water from overwhelmed drainage are flood events, not roof claims.
Documenting Damage the Right Way
Documentation is everything. A well-documented claim moves faster and gets approved more often than one with gaps.
Start immediately after the storm passes, as soon as it’s safe. Walk around the exterior of your home and photograph everything—missing shingles, dented flashing, debris on the roof, broken gutters, damaged siding. Take wide shots that show context and close-ups that show detail. If there’s a date stamp option on your phone camera, use it.
Video helps too. A slow walk around the property narrating what you’re seeing creates a record that photos alone can’t match. “This is the north side of the house, you can see three shingles missing near the ridge” is more useful to an adjuster than a silent photo they have to interpret.
Document interior damage the same way. Water stains on ceilings, wet insulation in the attic, damaged belongings—photograph all of it. If water is actively coming in, capture that on video if you can do so safely.
Write it down. Create a simple log: date of storm, time you discovered damage, what you observed, what temporary measures you took. This written record becomes part of your claim file and demonstrates you acted responsibly.
Keep damaged materials if possible. If shingles blew into your yard, don’t throw them away. If you have to remove damaged items from inside the house, set them aside. Physical evidence supports your claim.
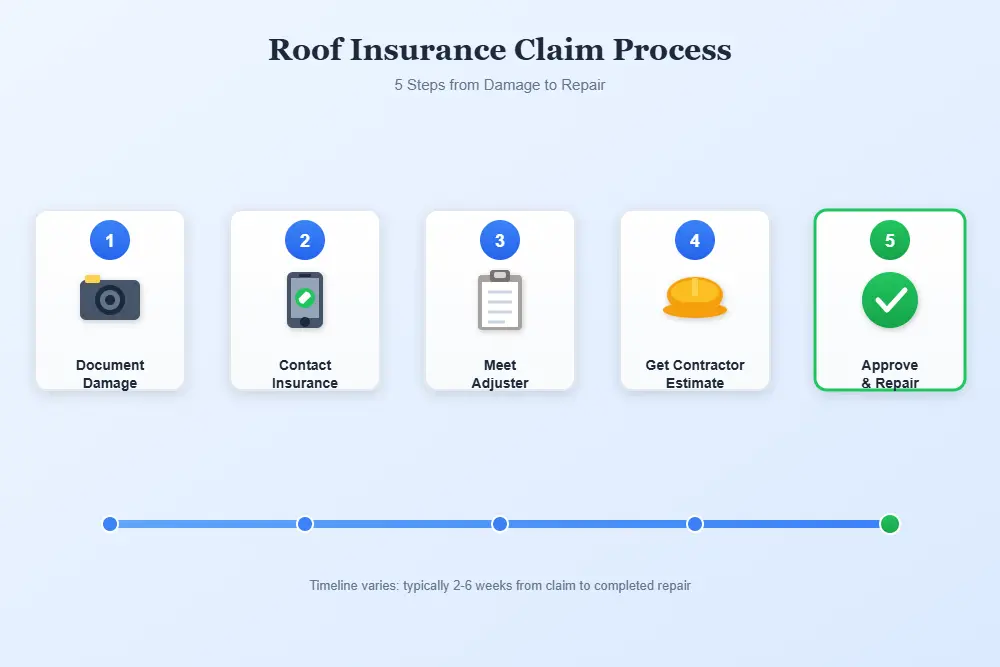
Filing the Claim — Step by Step
Here’s the process from start to finish:
1. Contact your insurance company immediately. Most policies require “prompt” notification of damage. Call the claims line—the number is on your policy documents and usually on your insurer’s website. Report what happened, describe the damage in general terms, and ask what the next steps are. Get a claim number and the name of the person you spoke with.
2. Take temporary protective measures. If there’s an active breach, cover it. A tarp over exposed decking or a bucket under an active drip prevents further damage. Insurance expects you to mitigate—if you let water pour in for three weeks while waiting for an adjuster, they may not cover the additional damage. Save receipts for any materials you purchase.
3. Wait for the adjuster. The insurance company will assign an adjuster to inspect the damage. This might take a few days or a few weeks depending on how widespread the storm damage was. The adjuster’s job is to assess the damage and estimate the cost to repair it.
4. Be present for the inspection. When the adjuster arrives, walk the property with them. Point out everything you documented. Don’t minimize—let them see the full scope. If you can safely access the roof with them, do it. If damage exists that isn’t visible from the ground, make sure they know.
5. Get your own estimate. Before you accept the insurer’s assessment, get an independent estimate from a licensed roofing contractor. This gives you a comparison point. If the adjuster’s number is significantly lower than a legitimate contractor’s estimate, you have grounds to negotiate.
6. Review the settlement offer. The insurer will send a written estimate and settlement offer. Read it carefully. Does it cover all the damage you documented? Does it account for proper repair methods and materials? If something’s missing or undervalued, you can dispute it.
7. Complete the repairs. Once you’ve agreed on a settlement, hire a contractor and get the work done. If your policy pays replacement cost, you may receive an initial payment (actual cash value) and a second payment after repairs are completed and documented.
Working With Insurance Adjusters
The adjuster isn’t your adversary, but they’re not your advocate either. Their job is to assess damage accurately and keep claim costs reasonable for the insurer. Your job is to make sure nothing gets missed.
Be factual and specific. “The storm tore off about fifteen shingles on the east slope and cracked several more” is better than “the roof got destroyed.” Adjusters deal with exaggeration regularly. Precise, honest descriptions build credibility.
Ask questions. If the adjuster says something isn’t covered, ask why. If they’re using terminology you don’t understand, ask them to explain. You’re entitled to understand how they’re evaluating your claim.
Don’t sign anything on the spot. If the adjuster presents paperwork, take it home and read it. If it’s a release or settlement agreement, make sure you understand what you’re agreeing to before you sign.
If you disagree with the assessment, say so professionally. “I think there’s additional damage you may not have seen” opens a conversation. Hostility closes it. Most adjusters are willing to take a second look if you can show them something they missed.
Understanding Depreciation and Payout Types
This is where roof insurance claims get complicated—and where homeowners often feel shortchanged.
Replacement Cost Value (RCV) policies pay what it actually costs to repair or replace your roof with materials of similar kind and quality. If your 15-year-old roof needs $12,000 in repairs, they pay $12,000 (minus your deductible).
Actual Cash Value (ACV) policies pay replacement cost minus depreciation. That same 15-year-old roof might be depreciated 50%, meaning the insurer pays $6,000 instead of $12,000. You’re responsible for the difference.
Many RCV policies pay in two stages. The first check covers ACV—the depreciated amount. The second check, called recoverable depreciation, comes after you complete repairs and submit documentation. If you don’t complete the repairs, you don’t get the second payment.
This is why getting your own estimate matters. If the insurer’s depreciation calculation or repair estimate is too low, you’ll feel it when the contractor’s bill comes in higher than your settlement.
Know which type of policy you have before you file. If you have ACV coverage and an older roof, the out-of-pocket gap can be substantial. That’s not the insurer cheating you—it’s how the policy was written. But it’s better to know upfront than to discover it when the check arrives.
Roof Insurance Claim Timelines — What to Expect
Claim timelines vary, but here’s a realistic range:
After you report the claim, an adjuster is typically assigned within a few days. The inspection might happen within a week under normal circumstances—but after a major storm that affects hundreds of homes, it can take two to four weeks or longer.
Once the adjuster submits their report, the insurer usually issues a decision within one to two weeks. If approved, the first payment often arrives within days of approval.
If you dispute the assessment, add time. Requesting a re-inspection, submitting additional documentation, or negotiating the settlement can extend the process by weeks or months. That’s not necessarily bad—a fair settlement is worth waiting for—but plan accordingly.
From storm to final repair completion, straightforward claims typically resolve in four to eight weeks. Complex or disputed claims can take three to six months. If active leaks are causing ongoing damage, make temporary repairs while the claim processes.
When to Involve a Public Adjuster
A public adjuster is a licensed professional who works for you—not the insurance company—to negotiate your claim. They typically charge a percentage of your settlement (often 10-15%).
Most straightforward claims don’t need one. If your damage is clear, your documentation is solid, and the insurer’s estimate is reasonable, you can handle the process yourself or with your contractor’s help.
Consider a public adjuster if:
The insurer’s estimate is significantly lower than your contractor’s estimate and they won’t budge. A public adjuster knows how to identify line items that were missed or undervalued and can negotiate more effectively than most homeowners.
Your claim was denied and you believe the denial is wrong. Public adjusters understand policy language and can often find coverage that the insurer overlooked or misapplied.
The damage is extensive or complicated. If you’re dealing with structural damage, multiple areas of the home, or a total loss scenario, professional help may be worth the fee.
You don’t have time or energy to fight. Some homeowners are dealing with health issues, family emergencies, or simply overwhelming stress after a disaster. Hiring a professional to handle the claim is a legitimate choice.
Interview any public adjuster before hiring. Ask about their experience with roof claims specifically, their success rate, and get references. A good public adjuster earns their fee by getting you a significantly higher settlement than you’d get alone.
Avoiding Common Mistakes That Lead to Claim Denial
Claims get denied for preventable reasons. Avoid these:
Waiting too long to file. Most policies require prompt notification. If you wait months after the storm to report damage, the insurer may question whether the damage actually came from that event—or deny the claim outright for late reporting.
Throwing away evidence. Those shingles in your yard are proof. That damaged section of ceiling is proof. Don’t clean up so thoroughly that you eliminate the documentation you need.
Failing to mitigate. If you know there’s a hole in your roof and you do nothing to cover it, additional damage that results may not be covered. Tarps are cheap. Use them.
Signing a contractor agreement before the claim is settled. Some contractors push homeowners to sign contracts immediately after a storm. Be cautious. You want a contractor who will work with you and your insurer—not one who pressures you before you even know what your claim will pay.
Accepting the first offer without question. The initial settlement offer is often negotiable. Review it against your documentation and your contractor’s estimate. If it’s short, push back.
Misrepresenting damage. Exaggerating or fabricating damage is insurance fraud. It will get your claim denied, your policy canceled, and potentially result in criminal charges. Be honest. Real storm damage doesn’t need embellishment.
Deductible Considerations
Your deductible is the amount you pay out of pocket before insurance kicks in. On roof claims, this matters more than people expect.
Standard homeowners deductibles are often $1,000 to $2,500. But many Michigan policies now have separate wind/hail deductibles—sometimes a percentage of the home’s insured value rather than a flat dollar amount. A 2% wind/hail deductible on a home insured for $300,000 means you’re paying $6,000 before coverage applies.
Check your policy before you file. If your damage estimate is close to your deductible, filing may not make financial sense. You’ll pay the deductible, receive little or no payout, and have a claim on your record—which can affect future premiums or insurability. The best time to understand your coverage is before severe weather hits—not after you’re standing in the yard with shingles on the ground.
That said, don’t let deductible concerns stop you from filing legitimate claims for significant damage. The deductible exists so you share some of the cost. It doesn’t mean you should absorb $15,000 in repairs because you’re worried about the $2,000 you’ll owe.
Never let a contractor offer to “waive” or “cover” your deductible. That’s illegal in Michigan. Your deductible is your responsibility. Any contractor suggesting otherwise is either planning to cut corners on the repair or committing insurance fraud—neither of which you want to be part of.
Filing a roof insurance claim isn’t complicated if you know the steps. Document everything. File promptly. Get your own estimate. Understand your policy. And don’t accept less than what the damage actually requires to repair properly. The question isn’t whether you can navigate this process—it’s whether you’ll take the time to do it right.
Frequently Asked Questions
How long do I have to file a roof insurance claim after a storm?
Most policies require “prompt” notification, typically interpreted as within days or weeks—not months. Some policies specify exact timeframes. Check your policy language, but the safest approach is to file as soon as you discover damage. Waiting creates doubt about when and how the damage occurred.
Will filing a roof claim raise my insurance premiums?
It might. Insurers consider claims history when setting premiums. A single weather-related claim may not significantly affect your rate, but multiple claims within a few years likely will. That said, a legitimate claim for significant damage is what insurance is for. Don’t avoid filing a $10,000 claim because you’re worried about a $200 premium increase.
What if my insurance company and my contractor disagree on the repair cost?
This happens regularly. Request a re-inspection and have your contractor present to walk through the estimate with the adjuster. If they still can’t agree, you can invoke your policy’s appraisal clause—both sides hire independent appraisers who attempt to reach agreement. It adds time but often resolves disputes.
Can I choose my own roofing contractor or does insurance assign one?
You choose. The insurance company may have a list of “preferred” contractors, but you’re not required to use them. Choose a contractor you trust, who is licensed, insured, and experienced with insurance repairs. The insurer pays for the work—they don’t control who does it.
What happens if my claim is denied?
Request a written explanation of the denial. Review it against your policy language and documentation. If you believe the denial is wrong, you can appeal internally with the insurer, hire a public adjuster to negotiate, or consult an attorney who specializes in insurance disputes. Denials aren’t always final.
Should I get a roof inspection before filing a claim?
Yes, if possible. A professional inspection identifies all damage—including damage you might not see from the ground. The inspection report becomes documentation for your claim and gives you realistic expectations about repair costs before the adjuster arrives.